In Studio 1 I created ClutterBug, a tool for Unity that allows people to quickly and easily place a large amount of environmental assets in a way that looks good.
However, it was still missing some features based on feedback. In MindState, ClutterBug was used to place down many of the 2D assets in the world (such as trees and clouds), however it became clear that the designers needed to be able to lock the spawning objects onto a single axis so that Clutter wouldn’t go through the ground.
This was a simple enough change. When the Nodes tell the Clutter class to spawn all the gameObjects, it passes through a random position between -1 and 1, which is then scaled up to the nodes size. By directly modifying this value, we can lock the spawned objects onto a single axis relative to the Node.
if (lockX)
spawnPos.x = 0;if (lockZ)
spawnPos.z = 0;
The players simply need to tick the bools in the inspector and they’re good to go.
The next problem was one that I wanted to be functional for some time now, and that is weighted random selection for the prefabs to be spawned. My vision was that the list of prefabs would display their prefab and their weight.
Firstly though, the objects had to randomly roll correctly. Following a general guide from this page, I implemented a method that gives weighted object higher chance of spawning, but not guarantee of one.
First, I made a new List comprised of floats. This list will be the same size as the prefab list, and each prefab will refer to this list when using their weighting.
public List<GameObject> prefabList;
public List<float> prefabWeights;
Next, in the RandomObject function, we add up the total weight of all the objects
float currCount = 0;
float totalWieght = 0;foreach (float weight in prefabWeights)
{
totalWieght += weight;//get total weight
}
Now, we get a random number between 0 and the total weight.
float rand = Random.Range(0, totalWieght);
This number is the “to reach” number. Now every object in the list adds their own weight to a incrementing total and checks if the overall amount is more than rand. When it is, it returns that object in the List.
for (int index = 0; index < prefabWeights.Count; ++index)
{
currCount += prefabWeights[index];if (currCount > rand)
{
return prefabList[index];
}
}
This function should always return an object in the list. If for some reason it doesn’t, it just returns a random object.
return prefabList[Random.Range(0,prefabList.Count-1)];
We can see the results of this code in the images
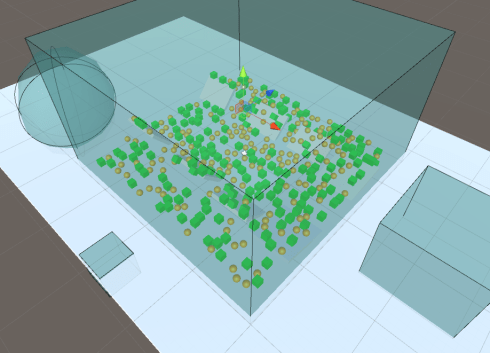
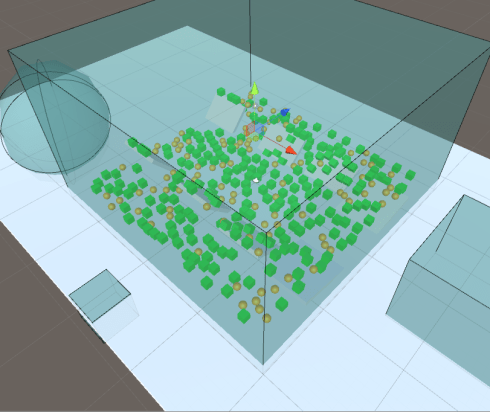
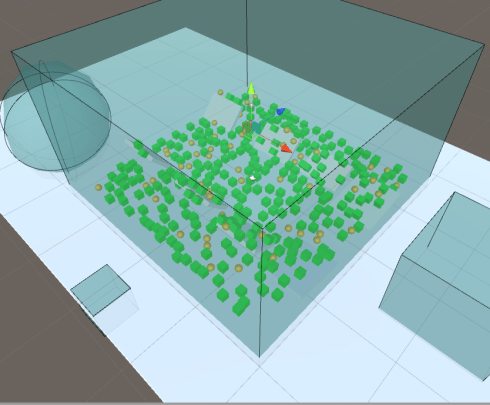
The higher the weight, the more likely and object will be chosen.
Now that this was working, we need to update the custom inspector to show these weightings in a meaningful way. However, this would prove to be tricky.
Before I added this, the custom inspector simply redrew the list as it normally would.
SerializedProperty property = serializedObject.FindProperty(“prefabList”);
serializedObject.Update();
EditorGUILayout.PropertyField(property, true);
serializedObject.ApplyModifiedProperties();
This grabbed the list of prefabs, updated the GUI to ensure it has the correct data, drew it out and then applied whatever changes to the original list.
However, we need more than this. I needed to be able to add in the GUILayout into the list array itself. Using this guide as a start point, I started rebuilding the List.
SerializedProperty list1 = serializedObject.FindProperty(“prefabList”);//get prefab list
EditorGUILayout.PropertyField(list1);//list label
EditorGUILayout.PropertyField(list1.FindPropertyRelative(“Array.size”));//list size
SerializedProperty list2 = serializedObject.FindProperty(“prefabWeights”);//now get the list with the weights
This shows the name of the list and the number of elements in the list. Then we can iterate over the list to display the individual elements
if (list1.isExpanded)//checks if the list is expanded
{
for (int index = 0; index < list1.arraySize; ++index)
{
EditorGUILayout.BeginHorizontal();
EditorGUILayout.PropertyField(list1.GetArrayElementAtIndex(index), GUIContent.none, GUILayout.Width(150));//the prefab
EditorGUILayout.LabelField(“Weight”, GUILayout.Width(60));
EditorGUILayout.PropertyField(list2.GetArrayElementAtIndex(index), GUIContent.none, GUILayout.Width(30));//the weight
EditorGUILayout.EndHorizontal();
}
}
This allows for the list to show the weight of that object. However, the list that is being referenced by this loop may not be a valid size yet. So we update the weighted list to match that of the prefab list. We do it in the editor because the only time people change the size of the prefabList is in the inspector, so we can do that above this loop.
while (nodeScript.prefabWeights.Count < nodeScript.prefabList.Count)
nodeScript.prefabWeights.Add(1f);//add if too smallwhile (nodeScript.prefabWeights.Count > nodeScript.prefabList.Count)
nodeScript.prefabWeights.RemoveAt(nodeScript.prefabWeights.Count – 1);
//remove if too big
This nicely draws out the list into a readable format

However, we there is a problem this. If we change the size of the list here in the inspector, the internal “list1” becomes different from the actual list, and creates an out of range index error. The second being that we can’t drag and drop objects directly onto the list, as we haven’t told the list how to add things in this way.
The first problem is fixed by applying the changes of list1 to the prefab list after grabbing the list size.
EditorGUILayout.PropertyField(list1.FindPropertyRelative(“Array.size”));
serializedObject.ApplyModifiedProperties();
This ensures that both lists are synched up.
Now, here I’m going to show you how NOT to fix a problem you shouldn’t have had. I only realised the incorrect solution I had while writing this. The above problem that was fixed by applying the properties wasn’t my first solution, and I thought I would have to MANUALLY apply those changes.
while (list1.arraySize > nodeScript.prefabList.Count)
{
if (nodeScript.prefabList.Count == 0)//if list is empty add null
nodeScript.prefabList.Add(null);else
nodeScript.prefabList.Add(nodeScript.prefabList[nodeScript.prefabList.Count – 1]);
}while (list1.arraySize < nodeScript.prefabList.Count)
nodeScript.prefabList.RemoveAt(nodeScript.prefabList.Count – 1);
This mimics the normal behaviour of changing the size of the lists. However, there is another problem that arises. Dragging and dropping was creating an error relating to the Event system in the GUI, and wasn’t adding the objects. What I should have done, is simply check if the GUI is in a state it shouldn’t be while rendering the object list, but what I did instead was MANUALLY ADD THE OBJECTS FROM DRAG AND DROP
if (Event.current.type == EventType.DragPerform)
{
Object[] dragged = DragAndDrop.objectReferences;for (int index = 0; index < dragged.Length; ++index)
{
nodeScript.prefabList.Add((GameObject)dragged[index]);
}
}
This would add the objects being dragged into the list. However, this was totally not needed, as simply applying the array size would cause drag and drop to work fine. However, to prevent errors, we just need to check the state of the GUI before drawing out the list.
if (list1.isExpanded && Event.current.type != EventType.DragPerform)
{//check if the mouse is dragging an object over the list before doing stuff//do the list
This creates a bug where you can’t replace an individual element of a list via dragging and dropping, but you can add new elements via drag and drop just fine, and can individually select elements via the assets window.